넷빈(NetBeans)6.9에서 ICEfaces-01-dataTable 사용하기
Written on 오후 8:04 by 강여사(J.Y.Kang)
넷빈(6.9)에서 ICEfaces-01-dataTable 사용하기
이번 게시물에서는 이번에 새로 나온 넷빈즈(NetBeans 6.9)에서 ICEfaces를 설치 및 활용하여 dataTable 를 사용해보도록 하겠습니다.
ICEfaces 는 간단히 웹 프레임워크 중 하나로, JSF 기반 자바 테크롤로지를 사용하여 RIA를 구축해주는 포괄적인 개발 프레임워크라 할 수 있습니다. 또한 Ajax Push 를 사용하여 실시간 적 협업이 가능한 것도 장점으로 뽑을 수 있구요.
예전 넷빈즈 6.5.1 버전때 기본으로 들어있던 Visual Web JSF 와 연결 Visual Web ICEfaces 는 그야말로 비주얼로 웹페이지를 디자인 해주는 좋은 기능이었죠. (이 VW ICEfaces는 넷빈즈 6.5.1 까지 지원되며 그 이상 넷빈즈에서 프로젝트를 이관(Migration)할 수는 있습니다만..
일단 현재 ICEfaces에서 공급하는 넷빈즈 플러그인에서는 VW ICEFaces 플러그인은 공급하고 있지 않습니다.
우선 작업환경은 다음과 같습니다. 넷빈즈 6.9 ICEfaces NetBeans 6.9 플러그인 (http://www.icefaces.org/) 에서 다운로드 (ICEfaces 계정 필요)
서버는 넷빈즈 6.9에 있는 GlassFish v3 로 진행합니다.
우선 가장 먼저 ICEfaces 에서 넷빈즈 6.9 플러그인을 다운로드 받고 넷빈즈 IDE 와 통합해야 합니다.
ICEfaces 홈페이지로 이동합니다.
http://www.icefaces.org/
음..좋군요. ^^
그럼 위에 메뉴에서 두번째 Downloads 를 누른 후 아래 제시된 조그만 팝업창에 Download Index를 클릭합니다.
ICEfaces 의 각종 다운로드가 있습니다.
현재 ICEfaces 버전은 1.8.2 와 2.0.0 으로 되어 있습니다.
이는 JSF의 1.2 버전과 2.0 버전의 차이점 때문이기도 합니다. 당연 지원되는 서버도 차이가 있습니다. 자세한 내용은 각자..^^;;
그럼 2번째 진한 파랑색 줄의 Tools Support 에서 NetBeans 앞의 주황색 삼각형을 클릭하여 아래를 확장 한 후 NetBeans-6.9 모듈(ICEfaces-2.0.0.Alpha3-Netbeans-6.9-modules.zip)을 다운로드 받습니다.
이때 다운로드 받으려면 ICEfaces 에 가입되어 있어야 합니다.
가입 절차는 생략하겠습니다. 적당한 곳에 다운로드 받은 압축파일을 풀고 넷빈에서 플러그인 추가를 진행합니다.
넷빈을 시작하고 위의 도구에서 플러그인을 선택 클릭합니다.
앞서 다운로드 받은 넷빈 플러그인 파일이 있기 때문에 탭의 다운로드를 선택한 후 아래 플러그인 추가 버튼을 클릭하여 아까 압축을 푼 (nbm 경로) 아래 넷빈 플러그 인 파일을 선택합니다.
2개의 파일 선택 후 열기 클릭
2개의 플러그인이 창으로 올라옵니다.
그럼 왼쪽 아래 설치를 눌러 진행합니다.
플러그인 설치 진행화면에 따라 계속합니다. 다음
동의 체크후 설치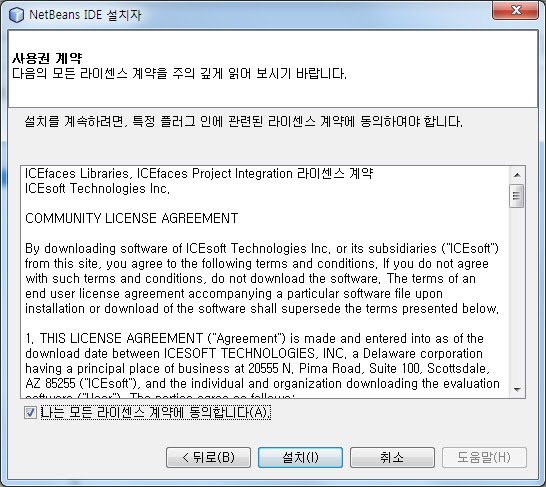
인증서 서명 신뢰 경고가 뜨지만 무시하고 계속
마침
이제 ICEfaces 프로젝트를 만들어 보도록 하겠습니다.
프로젝트 창에서 마우스 오른쪽을 클릭하여 새 프로젝트 선택
카테고리에서 Java Web 을 프로젝트는 Web Application 선택 - 다음
프로젝트 이름은 적당히 저는 prjIceFaces 라고 줬습니다.역시 경로도 적당히..다음
서버는 넷빈 6.9 를 설치하면 GlassFish Server 3 이 설치됩니다.
그냥 그거에 JavaEE Version은 EE5로 맞췄습니다.
지금은 굳이 EE6 으로 할 필요는 없어서리. - 다음
프레임워크에서 ICEFaes 를 선택합니다.
페이지 설명 언어는 2가지 유형이 있는데 JSPX로 지정했습니다.
나머지 Libraries 탭을 눌러 추가되는 라이브러리 버전도 확인 - 마침
그럼 스켈레톤 페이지라고 할 수 있는 웰컴페이지가 자동으로 만들어집니다. welcomeICEFaces.jspx 그리고 오른쪽 파레트(파레트가 자동으로 보이지 않으면 창에서 Palette를 선택하시면 됩니다) 에 ICEfaces 관련 컴포넌트들이 제시됩니다.
기본적으로 만들어지는 페이지가 어떤지 바로 실행해보도록 하겠습니다.
프로젝트에서 오른쪽 마우스 클릭 - 실행
서버가 시작되고 웹 브라우저에 다음과 같은 내용이 보입니다.
주소표시줄에 표시된 호출법도 잘 살펴보시기 바랍니다. http://localhost:8080/prjIceFaces/welcomeICEfaces.iface
다시 툴로 돌아와서 이번엔 JSF 백킹 빈(Managed Bean)을 만들도록 하겠습니다.프로젝트에서 마우스 오른쪽 클릭 - 새로만들기 - Other
JavaServer Faces 카테고리에서 JSF Managed Bean 을 선택합니다. - 다음
이번에 만들 내용은 테이블 예제 실습이므로 클래스 이름도 이렇게.. TableBean 으로 줬습니다.
아래 제시 이름은 inventoryList 로
패키지는 com.icesoft.icefaces.tutorial.component.table.basic
scope는 session ,
설명은 Backing bean for tree example 이렇게 줬습니다.- 마침
그럼 이제 Tablebean 의 내용을 복사해서 붙여넣습니다.
=================================================
package com.icesoft.icefaces.tutorial.component.table.basic;
/**
* A basic backing bean for a ice:dataTable component. This bean contains a
* Collection of IventoryItem objects which is used as the dataset for a
* dataTable component. Each instance variable in the InventoryItem obejct
* is represented as a column in the dataTable component.
*/
public class TableBean {
// List of sample inventory data.
private InventoryItem[] carInventory = new InventoryItem[]{
new InventoryItem(58285, "Dodge Grand Caravan", " Sto&Go/Keyless", 43500, 21695),
new InventoryItem(57605, "Dodge SX 2.0", "Loaded/Keyless", 28000 ,14495),
new InventoryItem(57805, "Chrysler Sebring Touring", "Keyless/Trac Cont", 31500, 15995),
new InventoryItem(57965, "Chrysler PT Cruiser Convertible", "Touring/Loaded", 7000 , 22195),
new InventoryItem(58095, "Chrysler Pacifica AWD", "Heated Lthr/19' Alloy", 43500, 31995),
new InventoryItem(58165, "Jeep Liberty Sport", "Loaded/Keyless", 31000, 26995),
new InventoryItem(58205, "Dodge SX 2.0", "Loaded/Keyless", 19500, 15495),
new InventoryItem(58245, "Chrysler Pacifica AWD", "Moonroof/DVD", 15500, 35695),
new InventoryItem(58295, "Pontiac Montana SV6 Ext", "Loaded/Quads", 40000, 22695),
new InventoryItem(58355, "Jeep Grand Cherokee", "Laredo/Trailer", 26500, 27495),
new InventoryItem(58365, "Jeep Grand Cherokee", "Laredo/Trailer", 27000, 28595),
new InventoryItem(58375, "Chrysler PT Cruiser", "Cruise/KeylessD", 29500, 17795),
new InventoryItem(58425, "Dodge Durango SLT", "Leather/3rd row", 32500, 26695),
new InventoryItem(58475, "Dodge Grand Caravan", "Quads/Rear AC", 52000, 19895),
new InventoryItem(58455, "Chrysler Sebring Touring", "Keyless/Trac Cont", 34000, 16695),
new InventoryItem(58465, "Chrysler Sebring Touring", "Keyless/Trac Cont", 32500, 15995),
new InventoryItem(58495, "Chrysler Sebring Touring", "Keyless/Trac Cont", 22500, 16695),
new InventoryItem(58155, "GM G2500 Cargo Van", "Extended/Auto/Air", 34000, 27795),
new InventoryItem(58275, "Dodge Dakota Q.C. SLT", "4x4/Loaded/Alloys", 22500, 27995),
new InventoryItem(58265, "Chrysler 300 Touring", "Heated Leather", 40500, 26495)
};
/**
* Gets the inventoryItem array of car data.
* @return array of car inventory data.
*/
public InventoryItem[] getCarInventory() {
return carInventory;
}
/**
* Inventory Item subclass stores data about a cars inventory data. Properties
* such a stock, model, description, odometer and price are stored.
*/
public class InventoryItem {
// slock number
int stock;
// model or type of inventory
String model;
// description of item
String description;
// number of miles on odometer
int odometer;
// price of car in Canadian dollars
int price;
/**
* Creates a new instance of InventoryItem.
* @param stock stock number.
* @param model model or type of inventory.
* @param description description of item.
* @param odometer number of miles on odometer.
* @param price price of care in Canadian dollars.
*/
public InventoryItem(int stock, String model, String description, int odometer, int price) {
this.stock = stock;
this.model = model;
this.description = description;
this.odometer = odometer;
this.price = price;
}
/**
* Gets the stock number of this iventory item.
* @return stock number.
*/
public int getStock() {
return stock;
}
/**
* Gets the model number of this iventory item.
* @return model number.
*/
public String getModel() {
return model;
}
/**
* Gets the description of the this iventory item.
* @return description
*/
public String getDescription() {
return description;
}
/**
* Gets the odometer reading from this iventory item.
* @return odometer reading.
*/
public int getOdometer() {
return odometer;
}
/**
* Gets the price of this item in Canadian Dollars.
* @return price.
*/
public int getPrice() {
return price;
}
}
}
=================================================
이제 이 빈을 사용하는 태그를 만들 차례인데 welcomeICEfaces.jspx 을 편집기로 엽니다.
그런다음 오른쪽 파레트의 ICEfaces 의 Data Table 을 편집기 창에 드래그하면 ice:dataTable 태그가 작성됩니다.
그럼 태그 안에서 스페이스바를 누를때마다 속성들이 올라옵니다.
작성할 전체 내용은 다음과 같습니다.
=====================================================
<ice:dataTable value="#{inventoryList.carInventory}" var="item">
<!-- Stock number -->
<ice:column>
<f:facet name="header">
<ice:outputText value="Stock #"/>
</f:facet>
<ice:outputText value="#{item.stock}"/>
</ice:column>
</ice:dataTable>
=======================================================
확인 후 해당 프로젝트를 build 하고 run 합니다.
프로젝트에서 오른쪽 마우스 클릭하여 빌드 하고 난후 실행
그럼 아래 그림처럼 브라우저에 해당 내용이 나옵니다.
음..뭔가 밋밋..--;; 이럴땐 스타일 시트입니다.
다시 넷빈으로 돌아와 헤드 부분에 다음 태그를 추가합니다.
------------------------------------------------------------------------------------
<link href="./xmlhttp/css/xp/xp.css" rel="stylesheet" type="text/css"/>
------------------------------------------------------------------------------------
다시 실행시켜보면 아래 그림처럼 스타일시트가 적용됨을 알 수 있습니다.
이러한 스타일 시트는 프로젝트의 라이브러리에 보시면 몇몇 가지가 더 있습니다. (잘 찾아보십시오 ^^ ) 그 중 royale 로 바꿔보겠습니다.
------------------------------------------------------------------------------------
<link href="./xmlhttp/css/royale/royale.css" rel="stylesheet" type="text/css"/>
------------------------------------------------------------------------------------
자 그럼 여기서 숙제 ^^;위의 Stock 을 참고로 아래 그림과 같이 다른 칼럼들도 출력해보시기 바랍니다.

여기까지.. ^^
수고하셨습니다.
다음엔 예전 넷빈 6.5.1 에서 VisualWeb ICEFaces 에 대해서도 알아보겠습니다.
to be continued...
![]()


